1.NIO的全称
nio 即非阻塞IO,是JDK1.4开始引入的一套全新的IO API。
包含在java.io包下,主要有三大组件:缓冲区buffer、通道channel、选择器selexcor。
2.为什么要用NIO
在传统的java io中:
I/O是阻塞式的:线程发起读写操作,必须等操作完成结束后才能继续,效率低下。
每个连接都要创建一个新的线程,造成资源浪费
而NIO采用非阻塞IO+多路复用,单线程就能够处理多个连接,提高伸缩和性能。
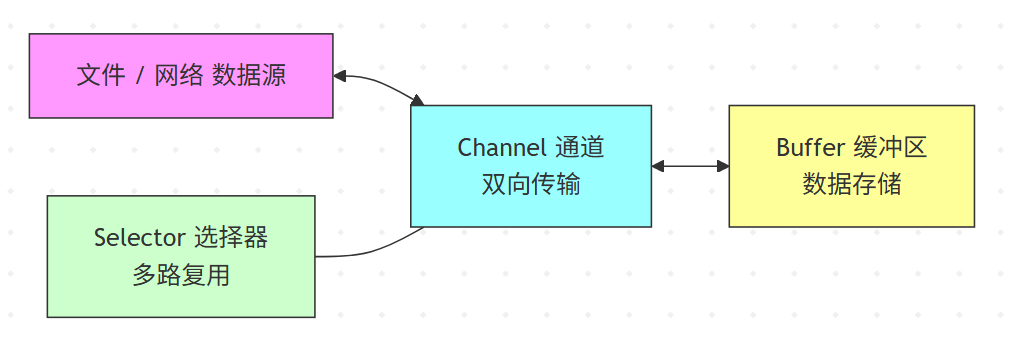
3.NIO的核心概念
Buffer缓冲区:数据缓冲区,所有的读写操作都在其中进行
Channel通道:双向通道,可同时进行读写操作
selector选择器:同时监听多个channel事件
4.具体流程
把数据写入buffer
从buffer读取数据
使用channel进行传输
通过selector注册多个channel
单线程就可以处理成千上万个连接,提升了服务器的吞吐能力。
5.应用场景
聊天服务器、http服务器、游戏服务器、大量文件传输
Netty框架就是在NIO上进行封装的
三大组件
1️⃣ Buffer(缓冲区)
本质:一块连续的内存块,数据读写的中转站。
特点:有位置(position)、容量(capacity)、界限(limit)三个核心属性。
常用操作:
put():写入数据到缓冲区。get():从缓冲区读取数据。flip():切换读写模式。clear():清空缓冲区以供再次写入。
好处:比传统流式 I/O 高效,可以反复读写,不必每次都向内核申请内存。
2️⃣ Channel(通道)
本质:类似流,但 双向(既可读也可写)。
常见类型:
FileChannel:文件数据传输。SocketChannel:TCP客户端通道。ServerSocketChannel:TCP服务端监听通道。DatagramChannel:UDP通道。
特点:
支持非阻塞模式(配合 Selector)。
通过 Channel 把数据读到 Buffer 或写出 Buffer。
例子:
FileChannel channel = new FileInputStream("data.txt").getChannel();
ByteBuffer buffer = ByteBuffer.allocate(1024);
channel.read(buffer); // 从文件读数据到缓冲区
3️⃣ Selector(选择器)
本质:多路复用器,可以用一个线程监控多个 Channel 的状态。
作用:
注册 Channel,并监听它们的事件(如
OP_READ、OP_WRITE、OP_ACCEPT)。当 Channel 就绪时,会通知 Selector,应用程序即可处理数据。
好处:无需为每个连接分配一个线程,大大提高可扩展性和性能。
典型用法:
Selector selector = Selector.open();
channel.configureBlocking(false);
channel.register(selector, SelectionKey.OP_READ);

while (true) {
    selector.select();
    Set<SelectionKey> keys = selector.selectedKeys();
    for (SelectionKey key : keys) {
        // 根据key的状态处理对应的事件
    }
}
📝 总结
Buffer:负责存储数据(内存)。
Channel:负责数据传输(通道)。
Selector:负责事件管理(调度)。
三者结合就能实现 非阻塞 I/O + 多路复用。
ByteBuffer
具体使用:
public static void main(String[] args) {
		// FileChannel
		try (FileChannel channel = new FileInputStream("data.txt").getChannel()) {
			// 使用ByteBuffer
			ByteBuffer buffer = ByteBuffer.allocate(10);
			while (true) {
				int len = channel.read(buffer);
				log.info("读取到的字节数:{}", len);
				if (len == -1) {
					break;
				}
				buffer.flip();// 切换成读模式
				while (buffer.hasRemaining()) {
					byte b = buffer.get();
					log.info("实际字节:{}", (char) b);
				}
				buffer.clear();// 切换成写模式
			}
		} catch (IOException e) {
			throw new RuntimeException(e);
		}
	}
具体流程:
向buffer中写入数据,例如调用channel.read()
切换为读模式,调用buffer.flip()
使用buffer.get()获取具体内容
切换为写模式,调用clear或compact
重复步骤1~4
内部结构:
三个属性:capacity容量、position位置、limit界限
初始:
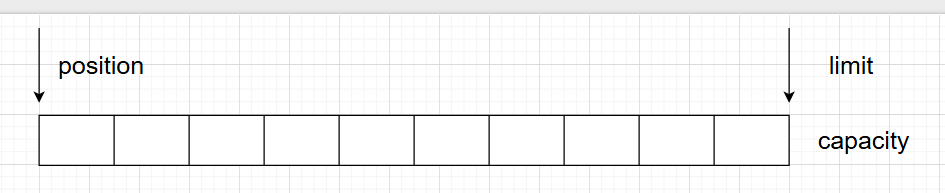
写模式:移动position,下图为写入4个字节后的状态

读模式:调用flip()动作后,移动position到首位置,limit移动到最后一个字节的位置

读取写个字节后的状态:

执行clear后:

常用方法
public static void main(String[] args) {
// 分配空间
ByteBuffer buffer = ByteBuffer.allocate(10);
// 写入数据
buffer.put(new byte[]{1, 2, 3, 4, 5, 6, 7, 8, 9, 10});
buffer.flip();// 切换成读模式
System.out.println(buffer.get());
System.out.println(buffer.get());
System.out.println(buffer.get());
System.out.println("======");
// rewind();从头开始读
buffer.rewind();
System.out.println(buffer.get());
System.out.println(buffer.get());
System.out.println("======");
// mark();标记当前位置
buffer.mark();
System.out.println(buffer.get());
System.out.println(buffer.get());
System.out.println("======");
// reset();回到mark的位置
buffer.reset();
System.out.println(buffer.get());
System.out.println("======");
// get(i);//通过索引获取
System.out.println(buffer.get(3));
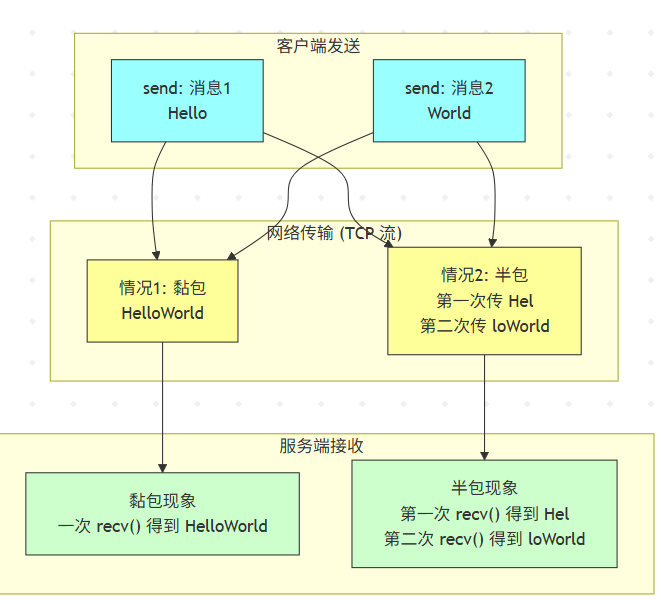
}解析黏包和半包
黏包和半包是网络编程(尤其是 TCP 编程)里经常遇到的两个现象。
黏包:多条应用层消息在接收方看起来被“黏”到了一起,变成一条。
半包:一条完整的应用层消息在接收方被拆成了多段,接收时只能收到部分内容。
解决代码:
public static void main(String[] args) {
		ByteBuffer source = ByteBuffer.allocate(32);
		source.put("Hello World\nI’m ZhangSan\nH".getBytes());
		split(source);
		source.put("ow Are You?\n".getBytes());
		split(source);
		source.flip();
	}

	private static void split(ByteBuffer source) {
		source.flip();
		for (int i = 0; i < source.limit(); i++) {
			if (source.get(i) == '\n') {
				int len = i + 1 - source.position();
				ByteBuffer target = ByteBuffer.allocate(len);
				for (int j = 0; j < len; j++) {
					target.put(source.get());
				}
				System.out.println(new String(target.array()));
			}
		}
		source.compact();
	}
文件编程
两个channel传输数据
使用transferTo方法,主要用于 高效地将文件内容从一个通道传输到另一个通道。
方法签名
public abstract long transferTo(long position, long count, WritableByteChannel target)
        throws IOException
参数
position:文件开始传输的位置(字节偏移量)。
count:要传输的字节数。
target:目标通道(必须是
WritableByteChannel,比如SocketChannel、FileChannel等)。
返回值
实际传输的字节数(可能比
count少)。
特点
零拷贝 (Zero-copy):底层会尝试使用操作系统提供的零拷贝机制(如 Linux 的
sendfile),避免了 Java 用户态和内核态之间的数据拷贝,提高性能,减少内存占用。效率高:特别适合文件传输场景(例如实现高性能的 HTTP 文件下载、NIO 网络编程中的大文件传输)。
限制:
传输大小可能受操作系统限制(比如 Linux 单次调用最大 2GB)。
有些平台上实现不支持
transferTo,会退化为普通循环读写。如果目标通道不支持(例如非
FileChannel或SocketChannel),可能会抛异常。
示例
public static void main(String[] args) {
		try (FileChannel from = new RandomAccessFile("H:\\vmos\\centos7.iso\\CentOS-7-x86_64-DVD-2009 (1).iso", "r").getChannel();
			 FileChannel to = new RandomAccessFile("to.iso","rw").getChannel()
		) {
			//size 文件大小
			long size = from.size();
			long start = System.currentTimeMillis();
			//left 文件剩余字节数
			for (long left = size; left > 0;) {
				log.info("position:{},left:{}", (size - left), left);
				left -= from.transferTo(size - left, left, to);
			}
			log.info("耗时:{}s", (System.currentTimeMillis() - start) / 1000);
		} catch (IOException e) {
			e.printStackTrace();
		}
	}
Paths
位置:java.nio.file.Paths
作用:提供静态方法将字符串路径或 URI 转换为 Path 对象。(在 Java 7 引入的 NIO.2 中,Path 是代替传统 File 的核心类,功能更强大)
常用方法:
根据字符串路径或uri构建Path对象
Path p = Paths.get("C:/Users/test.txt");
Path p = Paths.get(new URI("file:///C:/test.txt"));
需要配合Files类来操作文件
Files
位置:java.nio.file.Files
作用:对 Path 对象进行操作(创建、复制、移动、删除、读写内容、检查属性等)。
(可看作 Path 的“工具类”)
文件/目录操作
文件属性(元数据)
文件内容读写
目录流与遍历
示例
import java.io.IOException;
import java.nio.charset.StandardCharsets;
import java.nio.file.*;

public class PathsFilesDemo {
    public static void main(String[] args) throws IOException {
        // 1. 获取 Path
        Path path = Paths.get("example.txt");

        // 2. 写入文本
        Files.write(path, "Hello World".getBytes(StandardCharsets.UTF_8));

        // 3. 读取文本
        String content = new String(Files.readAllBytes(path), StandardCharsets.UTF_8);
        System.out.println(content);

        // 4. 判断文件属性
        System.out.println("Exists? " + Files.exists(path));
        System.out.println("Size: " + Files.size(path) + " bytes");

        // 5. 复制文件
        Files.copy(path, Paths.get("copy.txt"), StandardCopyOption.REPLACE_EXISTING);

        // 6. 遍历目录
        Files.walk(Paths.get("."))
             .filter(Files::isRegularFile)
             .forEach(System.out::println);
    }
}